Now that the US reveal event is behind us we are gearing up for the UK reveal event in October. Alex is working on his cabinet as we speak and it’s a good time to take care of some housekeeping items. The most often-asked question by everyone who has seen the cabinet in person or talked to someone who has is “How did you recreate the Nintendo finish on the Sky Skipper cabinet?” One word – laminate. As soon as I tell everyone that I laminated the cabinet the next question is always “What kind of laminate is it and how do I get it for my projects?”
That’s what we’re here to answer. But first…
A bit of backstory on the Sky Skipper restoration(s)…
Ever since we took the black veil off the cabinet at SFGE, much has been discussed around the restoration of the US cabinet (Serial #00013) and the decision to laminate vs. paint. The biggest point of consideration for me with the cabinet was that I wanted to get the closest approximation to the factory Nintendo finish as possible. Going the paint route would have necessitated many (many) rounds of sanding, painting, sanding, etc. and I still wouldn’t have gotten to the finish I wanted since I don’t have HVLP equipment, automotive-grade paint and the skill to apply either one. With that, re-laminating seemed to be the best option given that I could get a factory-perfect finish in one motion. The next hurdle would be finding that one, special laminate that had the proper finish and thickness so that it could be laid over the existing cabinet sides/front and work with the t-molding for that ‘crisp’ look we are all after with our restorations.
Since Alex is planning on doing the exact same process for the UK cabinet (Serial #00014), we wanted to make sure we both went the same route and that it was as close-to-perfect as possible.
Just for reference, here’s what I started with – a solid, but well-worn, Nintendo Vs. Unisystem upright.


This cabinet had lots of nicks, gouges and some scratches on both sides that ran most the height… some of them really deep as well. It was an Atari-issued cabinet (as much as I can tell) so I can’t immediately say it was truly a Donkey Kong or Popeye in a previous life – not unless Atari picked these cabinets up from Nintendo as second-runs.
Although the end result on a laminate job creates that ‘perfect factory finish’ there’s a lot of prep work that has to be done. In this situation, that meant a lot of bondo work on the original sides, front and back, as the laminate needs a solid and completely flat surface to adhere to.
Here’s a few shots of the cabinet restoration in-progress. You can see the method used to bondo the cabinet (I use wide painters tape to create the flat edge necessary for sanding) to repair all the surface imperfections. After sanding, the laminate can then be cemented on and properly trimmed to size.
")
")
")
")
")
")
")
Makes for a really nice and smooth, glossy finish that works well with the cabinet contours, doesn’t it?
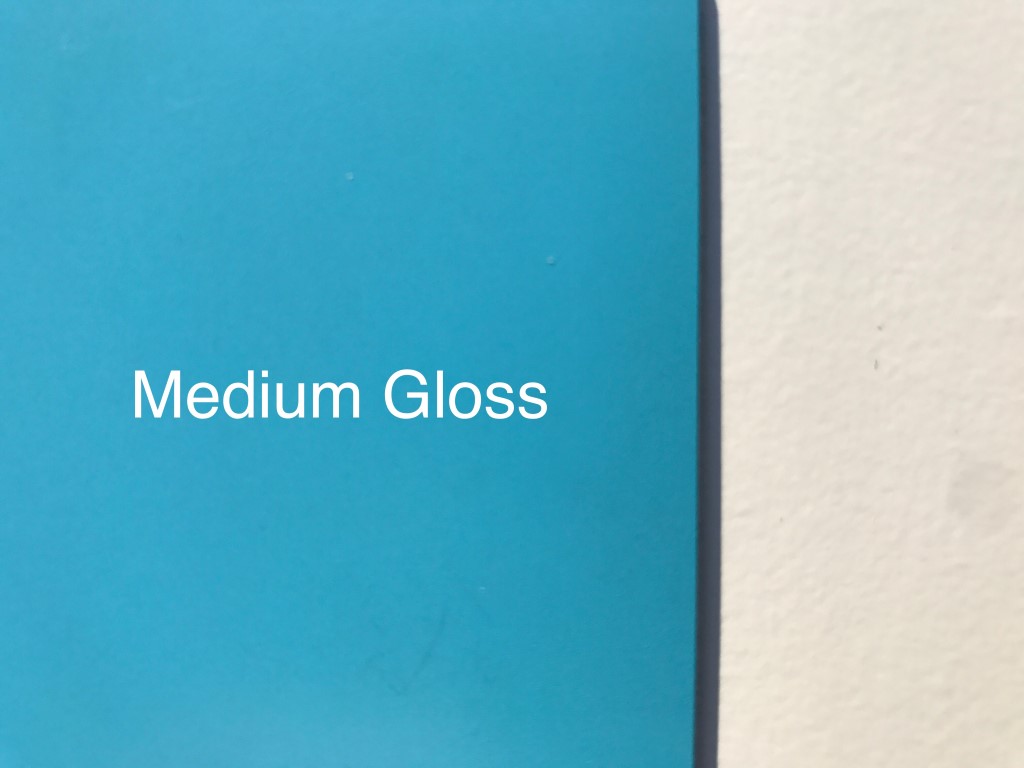
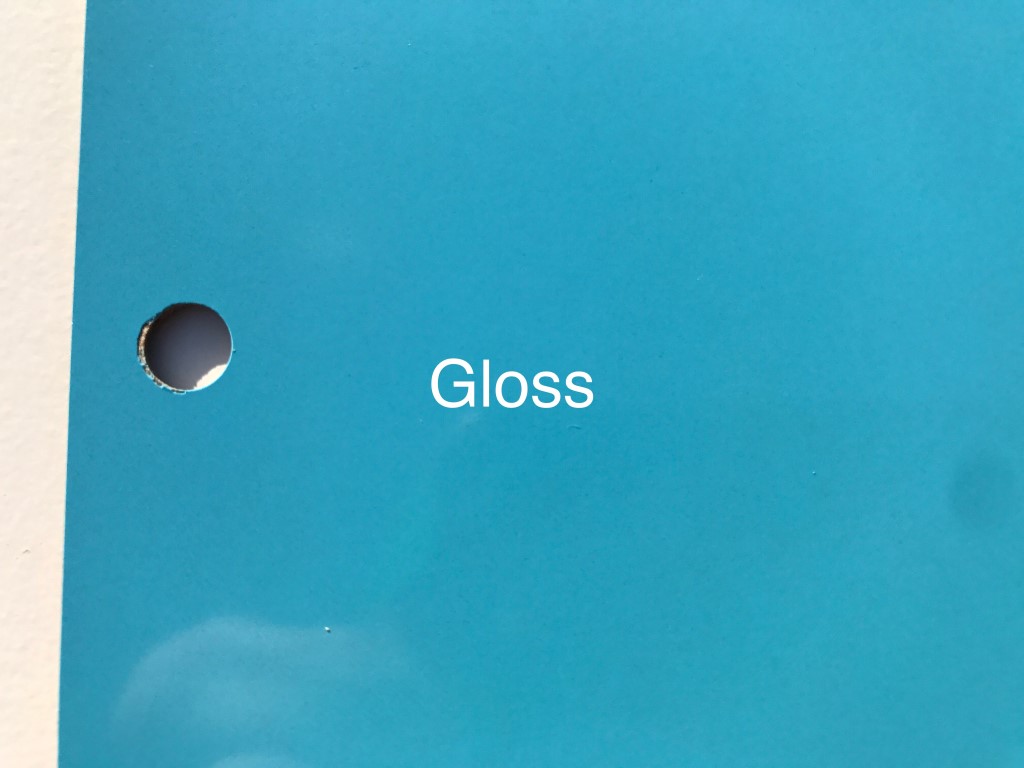
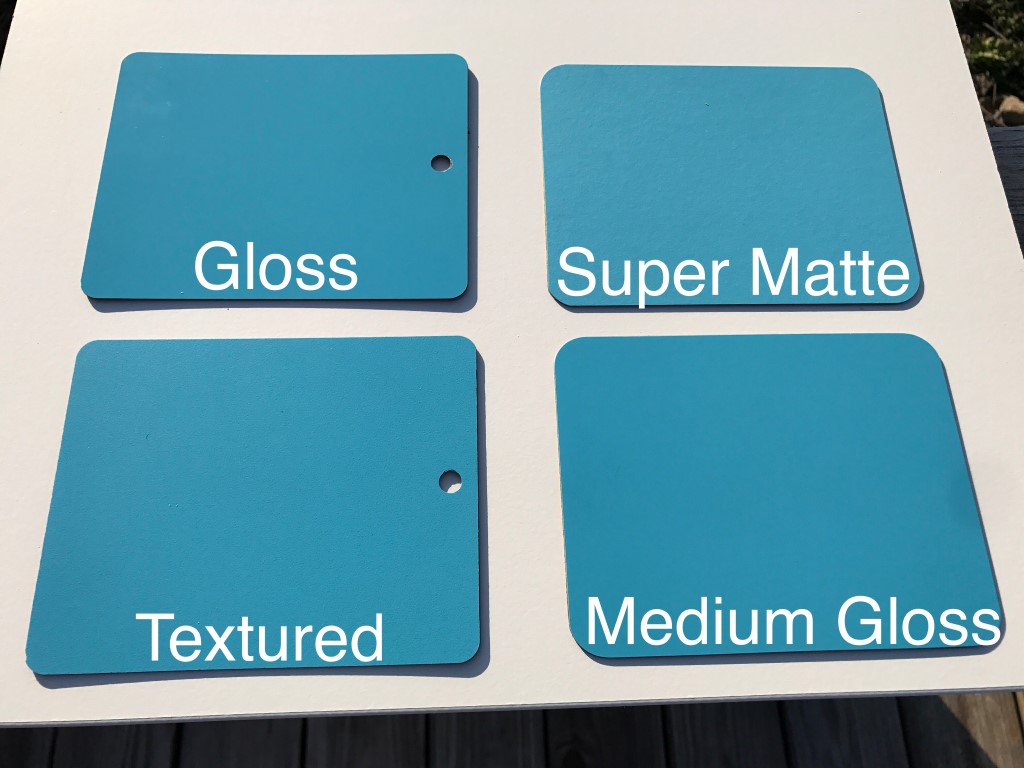
There were several choices of finishes that I worked through before I settled on the gloss used for Sky Skipper. The laminate used is Nevamar from Panolam Surface Systems. If you check their website, they have a total of 22 finishes that can be ordered. I wound up ordering 4 samples that I thought would be the closest matches and I got lucky in that one of them wound up being what I considered to be a near-perfect match:
| Finish | Reflectiveness |
Sample |
| Super Matte | Smooth, non-reflective finish @ 2.7 Nominal Gloss Units | 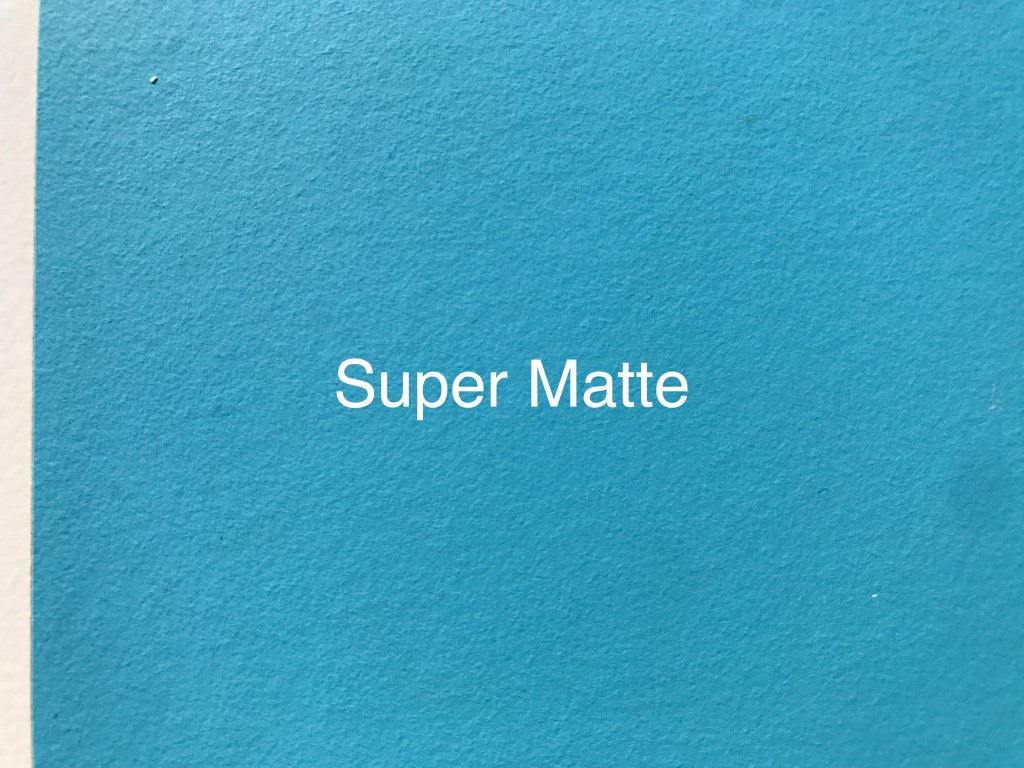 |
| Textured | Low gloss, textured finish @ 8.5 Nominal Gloss Units | 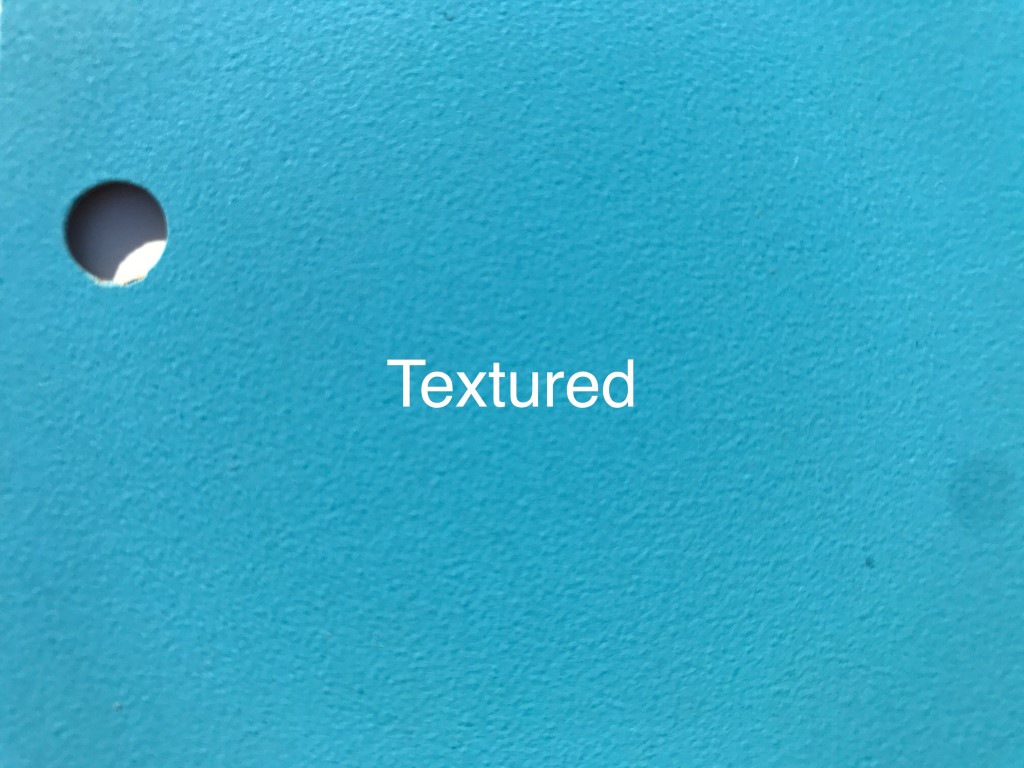 |
| Medium Gloss | Medium gloss, smooth finish @ 35.0 Nominal Gloss Units |
 |
| Gloss | High gloss, smooth finish @ 109.4 Nominal Gloss Units |
 |
So much to choose from…
When you look at each of the four finishes individually, super-matte isn’t an option, while textured is a good ‘five feet away’ finish that would work well. However, if you are looking for that perfectly-smooth finish then it comes down to either ‘Medium Gloss’ or Gloss. Of the two, Gloss is the best choice, as ‘Medium Gloss’ is shiny, but viewing a reflection in that finish doesn’t net enough detail when compared to the factory gel-coat finish of a plywood Nintendo cabinet. Even though it was smooth, it just wasn’t ‘sharp’ enough when compared to the factory finish… in fact, it looked too dull.
Gloss actually yields a sharper-than-factory reflection, but I figured it the best option, as I feel it is the best match for what would most closely approximate the gloss level of a factory-new cabinet before aging for 30+ years in and out of the sunlight.
Here’s a good comparison of the finishes next to each other, as well as seeing how they look under a bright light and the factory finish under a bright light to round out the comparison, as well.
| Finish | Reflectiveness under light | Notes / Thoughts |
| Super Matte | 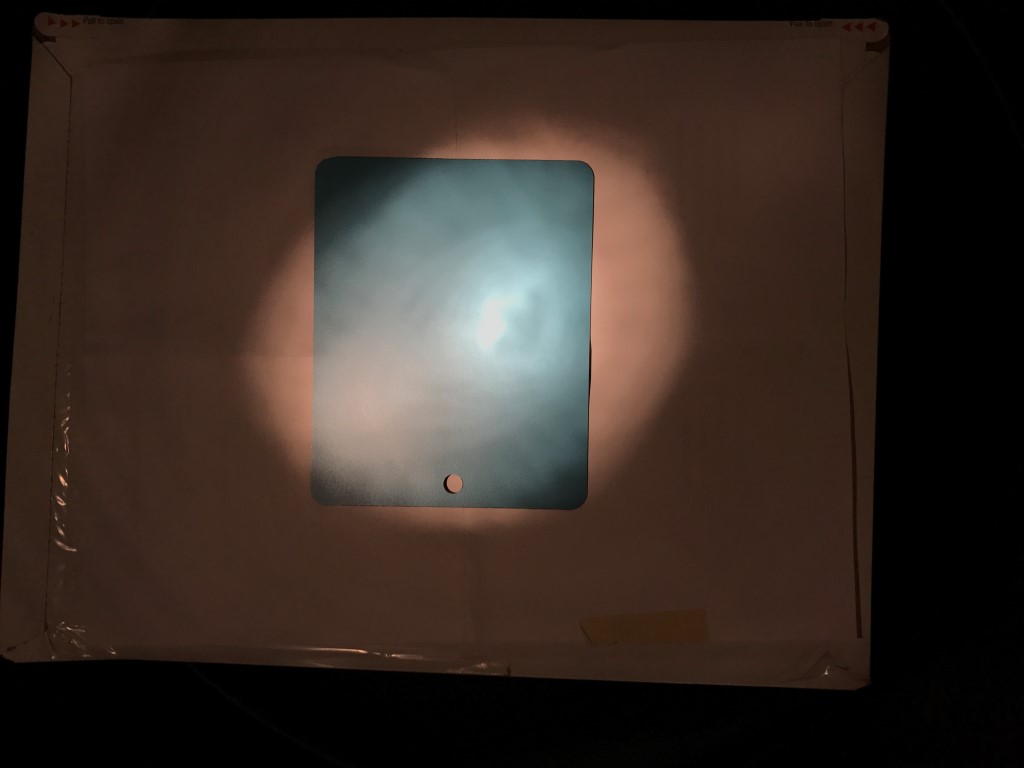 |
This finish is really dull and doesn’t reflect light at all. The matte has a bit of a ‘bumpy’ feel to it and it just looks a bit ‘uneven’ when compared to the factory finish. |
| Textured | 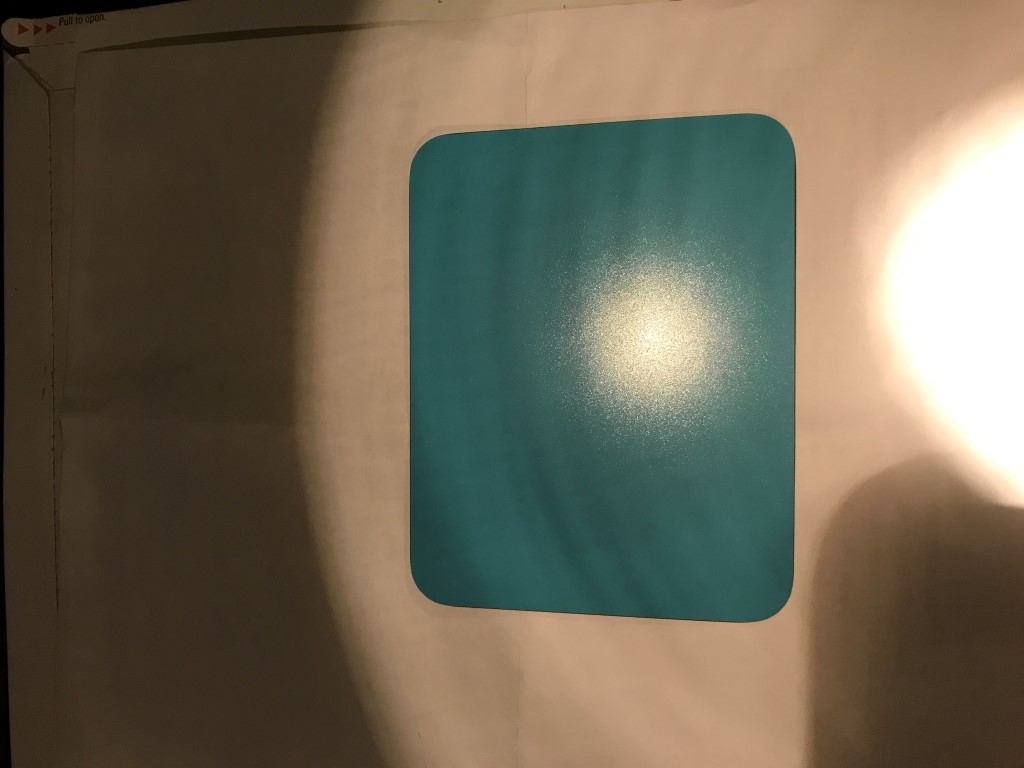 |
This finish is probably my second favorite, as it most closely approximates what would be used on a North-American particle board cabinet and is what I would use if restoring one of the NOA-produced cabinets.In fact, it’s likely a bit of a finish-upgrade for those cabinets. |
| Medium Gloss | 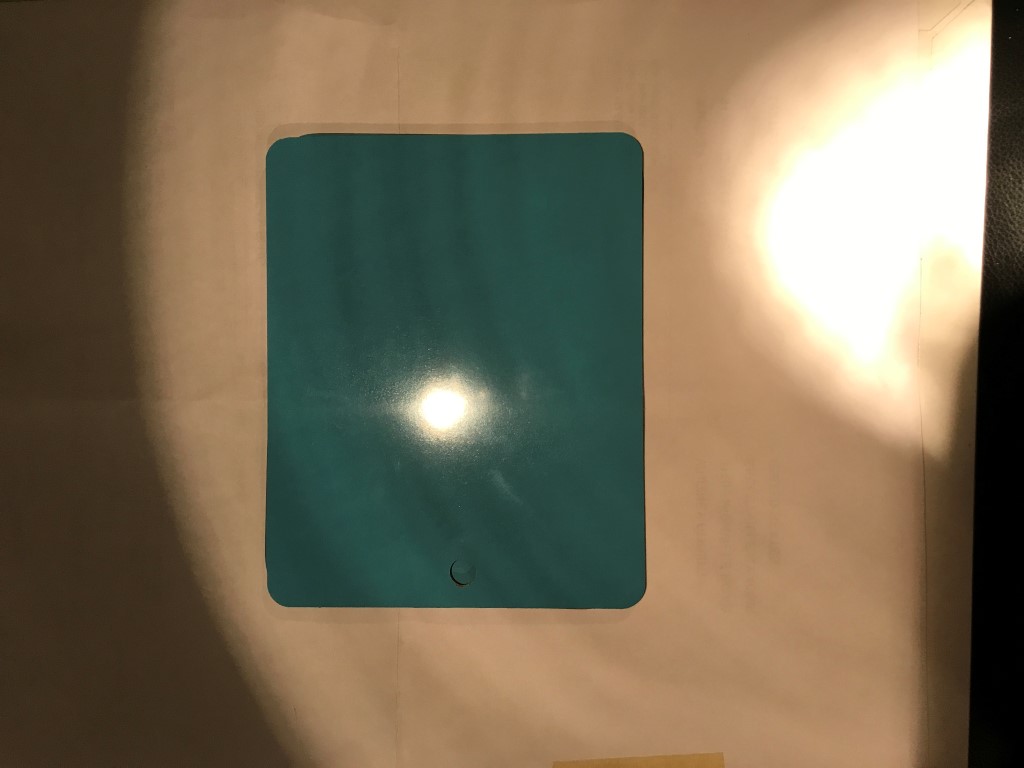 |
This finish has the proper sheen to it, but it just doesn’t reflect light as well as the factory finish and although very smooth, it just looks a bit too ‘dull’ when against the cabinet it would be covering. I tried to convince myself this was the best option, but I knew I wouldn’t be satisfied with it long-term. |
| Gloss | 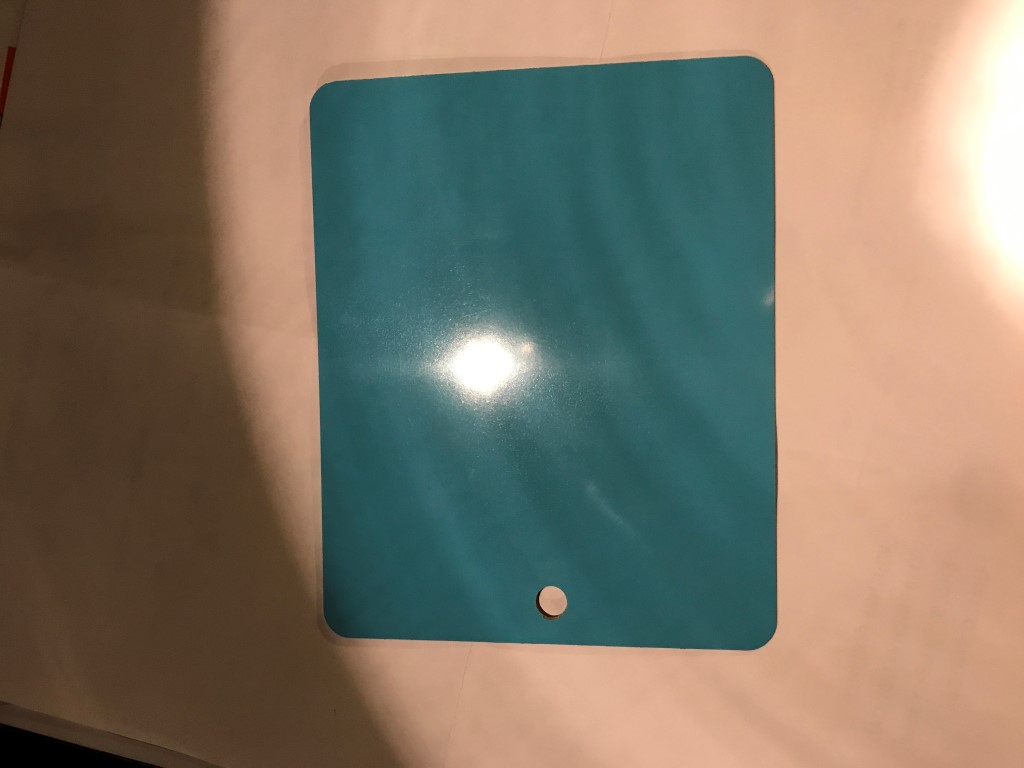 |
Pay dirt. This is the finish to go with if you want that ‘out of the crate’ new look for your machine. It’s a bit more reflective than the factory finish, but that’s really the only concession I can see when using this finish. I think that after it has some time to ‘age’ it will dull down just a bit and settle into a comparable finish. Until then, it looks awesome. |
| Nintendo Cabinet gel-coat | 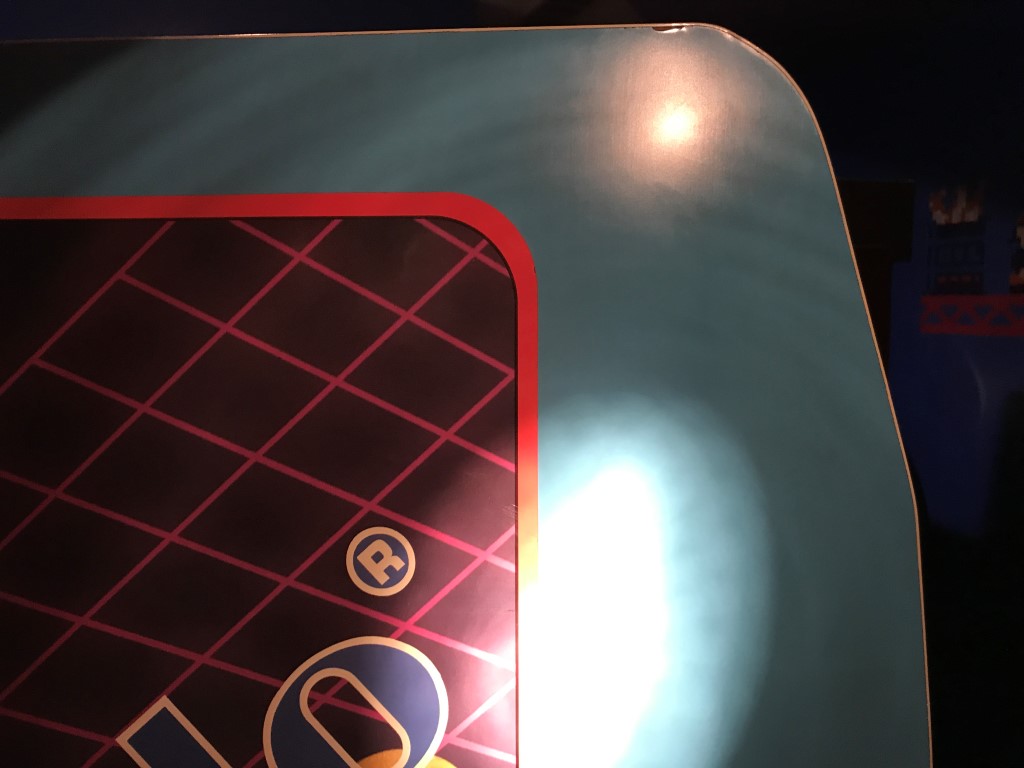 |
Take a look at the top spotlight on the cabinet and the light that is bouncing back. I used this as the gauge for what I was after.
It came down to either medium gloss or gloss and the gloss won it when looking at it with the naked eye. |
Let’s put a bow on it…
So there you have it, Nevamar laminate in a gloss finish. In order to get the color and thickness (vertical grade) spot-on, you’ll want to ensure you order the appropriate part number. For each of the popular Nintendo cabinet colors, I’ve included the appropriate part numbers and a sample below.
| Color Name | Part Number | Notes | Sample |
| Caribbean Blue
|
S3070G 4×8 V3 | See above – this is what I used for Sky Skipper and would work for all blue Donkey Kong/Popeye/Mario Bros. cabinets. | |
| Fresh Papaya
|
S8001G 4×8 V3 | Perfect match for the orange Nintendo cabinets, would look awesome for a DKjr or a DK3 build. | 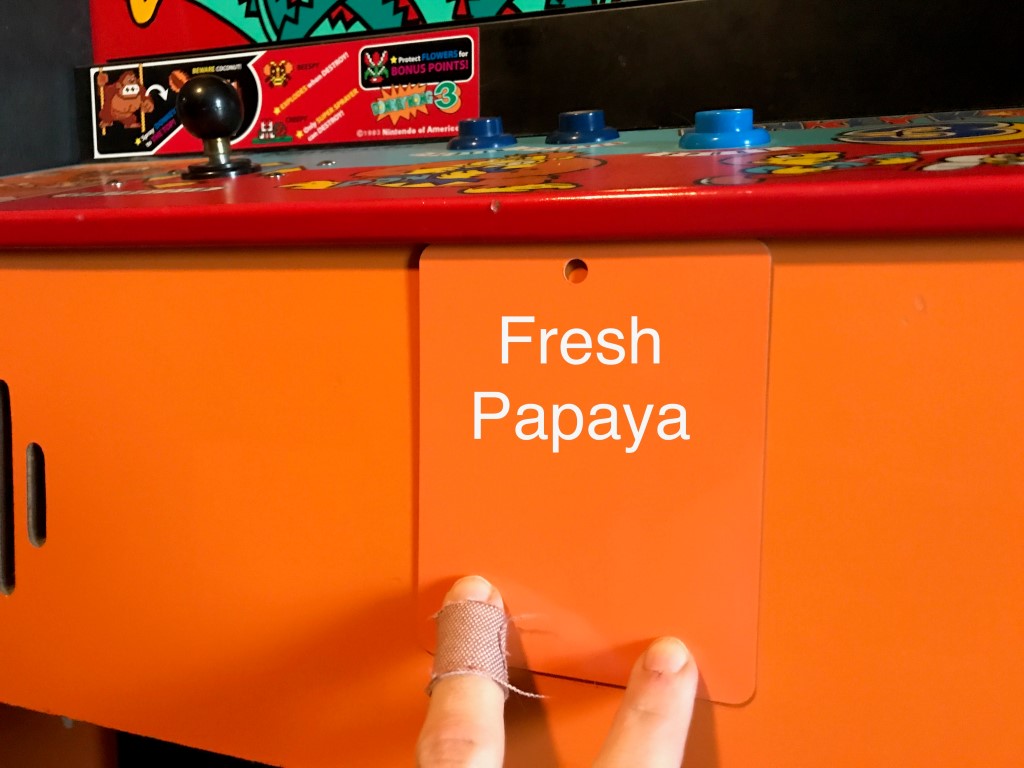 |
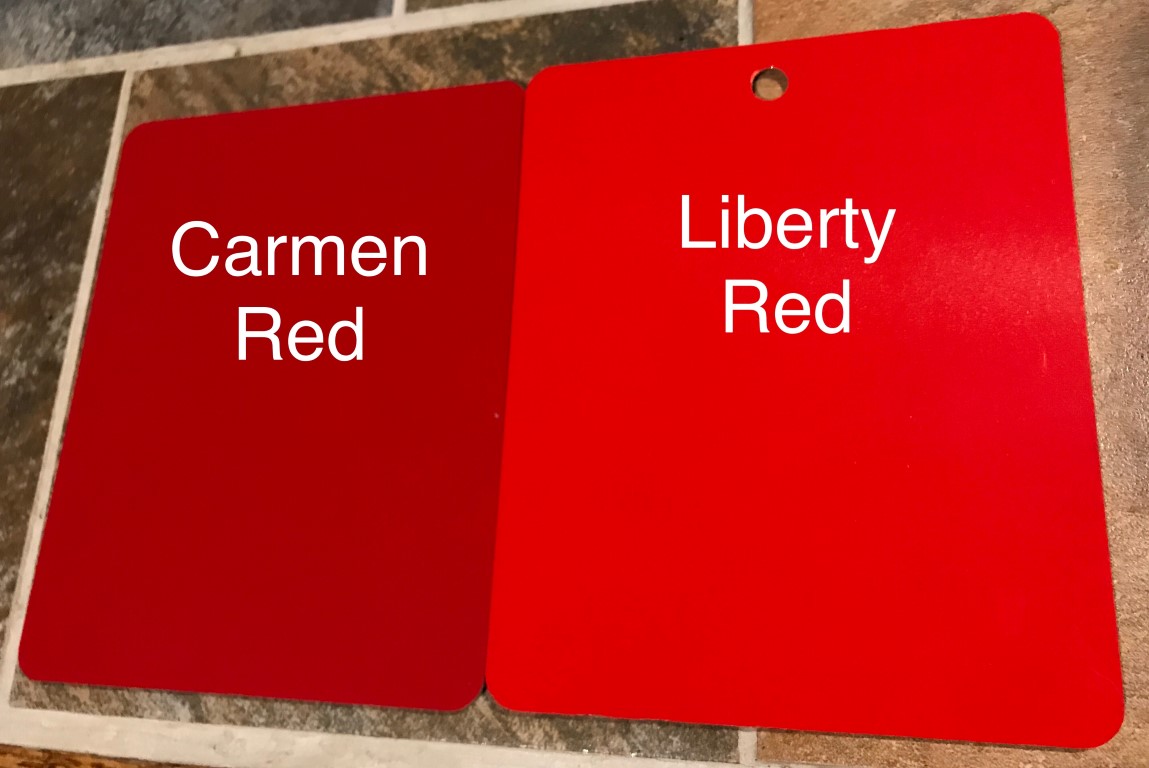
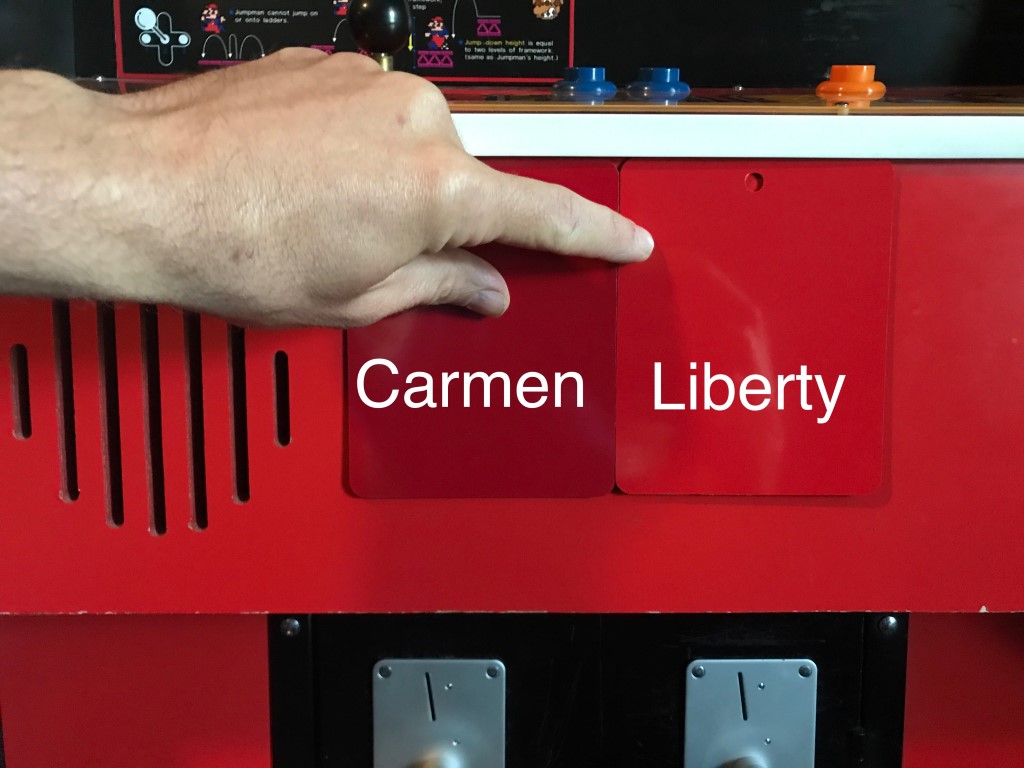
| Liberty Red
|
S1027G 4×8 V3 | This one is a bit tough… the factory-red finished cabinets are rare and hard to find in good shape. Personally, I wouldn’t laminate a red cabinet unless it was absolutely necessary in order to restore the game.
That being said, Liberty red is a near-perfect, dead-nuts match to the tint of the factory red gel-coat. I’ve included a comparison between it and Carmen Red (S1049) for comparison. |
|
|
Patriot Blue
 |
S3048G 4×8 V3 | Great option for doing a D2K cabinet. It’s the closest approximation to the ‘Sapphire Sparkle’ that the artwork kit calls for.
More information on D2K can be found at www.jeffsromhack.com |
 |
|
Regimental Blue
 |
S3016G 4×8 V3 | Another great option for doing a D2K cabinet if you prefer to go with something darker rather than a Royal(ish) blue. Truthfully – either this or Patriot Blue would look awesome on D2K – I don’t think there’s a wrong pick in either one of them. |


In order to fully cover the sides and front of a cabinet, you’ll need qty. 2 sheets of the 4’x8′ vertical grade laminate sheets. You’ll get a side from each full sheet, and have enough left over from each sheet to get the front coin door section and the speaker panel.
I ordered from Top Cabinet Hardware in Miramar FL – contact details are below. Plan on spending $39 for shipping, as the box used can hold up to 4 rolled sheets. Seeing as how you’ll need 2 sheets per cabinet, you’re best-served to either order with a buddy or order enough to do two cabinets at once, since the shipping is the same for one sheet as it is for four sheets.
Each sheet runs $70, so budget $140 per cabinet + shipping.
If you do order from John, tell him that Whitney sent you and *maybe* he can help you out a bit on shipping and/or a larger purchase.
John Alvelo – customerservice@topcabinethardware.com
Top Cabinet Hardware
14359 MIRAMAR PARKWAY
SUITE 119
MIRAMAR, FL. 33027
Phone: 888-509-6883Each sheet
www.topcabinethardware.com
So there you have it! All the laminate info you’d ever need in order to get your Nintendo cabinet looking factory fresh.
Let me know your thoughts and what you wind up doing for your restoration (or build)!

July 16, 2017
Awesome!
September 25, 2017
Kman! Thanks for the note – hope the laminate info can do you some good!
November 15, 2017
Very helpful, thanks! Did you take the coin door panel off for laminating and what router bit did you use to route out the speaker grill?
December 9, 2017
Hi SOpp,
No – I did not remove the coin door panel to laminate it. You will need to measure twice (or four times) and cut once. If you are spot-on with your measurements and cut then it will save you a lot of time and you won’t have to take the front half of the cabinet apart.
As for the router bit to cut the speaker grille? That was done with a 1/4″ flush-trim carbide bit. It has no bearing, so you have to be very steady with it. Here’s a link – https://www.lowes.com/pd/Bosch-Solid-Carbide-Flush-Trimmer-Bit-Self-Piloted-1-4-in-x-1-4-in-Laminate-Trim-Bit/1084639
December 11, 2017
Thanks for the info, I ended up taking off the entire front off. It wasn’t terribly difficult though the staples were a bit of a pain to remove.
For the speaker grill bit I was able to find a 1/4″ one with a bearing. https://www.amazon.com/gp/product/B01N9855P5/
March 21, 2018
Glad to hear you made some progress! The 1/4″ bit – with a bearing – is a find. Thanks for posting back the link!